desserts · food + drink · posts

Caramelized Pineapple with Chilli and Sweet Coconut Broth

DSC_0018-3

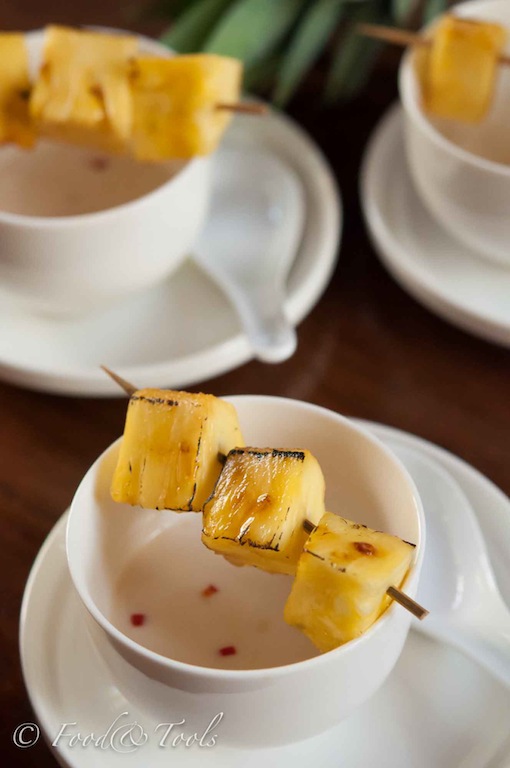
Easing myself into the new year with this light and refreshing dessert for this months blog hop themed Tropical Paradise, hosted by Nic from Dining with a Stud. I love tropical flavours and the combination of fresh pineapple and coconut is a favourite. Our weather is not very tropical at the moment but blasting the fruit with some heat from a kitchen blowtorch and adding a little fresh chilli to a coconut based broth gives this dessert a touch of tropical paradise.

The kitchen blowtorch is a very handy tool to have and I mostly use it for adding a thin crisp caramel coating to crème brûlées, browning some meats and fish, adding a touch of colour to meringue toppings, marshmallows and gratins! Also a great tool for lighting candles and if you are into food styling for photography then a kitchen blowtorch will come in useful!

DSC_0038Using the kitchen blowtorch to add a quick glaze of caramel over fruit and intensify its flavour couldn’t be simpler, especially when preparing a small amount. If I was entertaining a larger crowd I would use the grill. As coconut sugar is quite solid a looser sugar like muscavado is used for sprinkling over the pineapple before caramelizing. The sweet coconut broth can be made ahead and chilled but best to caramelize the pineapple before serving. If you are not a fan of pineapple,  replace with bananas, which will be just as delicious!

Caramelized Pineapple with Chilli and Sweet Coconut Broth

Ingredients:

  • 400ml coconut cream
  • 1 lemongrass stalk, bruised
  • 2 kaffir lime leaves
  • zest and juice of 1 lime
  • 50g coconut sugar
  • 1 ripe pineapple, cut lengthways into quarters, core and skin removed
  • muscavado sugar, for caramelizing
  • 1 small red chilli, de-seeded and very finely chopped

How to make: Place the coconut milk, lemongrass, kaffir leaf, zest and juice of lime and coconut sugar into a saucepan. Gently bring the contents of the saucepan to a boil, stirring to dissolve the sugar. Turn down the heat and gently simmer for about five minutes. Remove from heat and cover the saucepan with a lid and leave the broth to infuse and cool completely. Discard the lemongrass and kaffir leaf.

Pat dry the pineapple with some kitchen paper. Sieve a light layer of brown sugar over the pineapple. Use the blow torch in a sweeping motion over the sugared pineapple to caramelize. Cut the pineapple into desired sized chunks and thread onto a wooden skewer.

Divide the broth into small bowls and scatter over a little fresh chilli, place the caramelized pineapple skewers over the bowl, serve immediately! Serves 4 to 6.

This post is part of the Sweet Australian Blog Hop, head over to Nic’s blog Dining with a Stud to see all the other delicious Tropical Paradise entries!SABH_13-01_Tropical-300-1

appetizers · food + drink

Edamame Beans with Vanilla Sea Salt

DSC_0022 copyNew years resolutions are not something I make but I like to think that over the next twelve months I will build on past experiences (good and bad) of each year and keep moving forward! These past few weeks have been busy, with lots of cooking, eating and entertaining, so I am quite happy (at times) when the easiest meal of all (not necessarily the quickest) is only a phone call away!

In fact, living in Bahrain with so many eateries offering a variety of cuisines (dine in or take-out) you would never have to set foot inside the kitchen again… perish the thought! I would miss putting all my pots, appliances and kitchen jewellery to good use, cooking, entertaining, food photograph and styling… the kitchen is the hub of our home!twig bean copy

There are always a few essentials in the freezer and although it is looking rather empty at the moment, I still have a few bags of edamame beans stashed inside! In Japanese “eda” means “twig” and “mame” means “bean,”  also known as twig beans or hairy beans… but I think edamame sound better! The bean inside is actually a un-ripened soya bean, which is highly nutritious, rich in protein and has all the essential amino acids. High in fiber the edamame bean makes a healthy filling snack and only takes minutes to prepare! Take edamame beans to work when hunger strikes, put them into kids lunch boxes (minus the salt), serve them as an easy pre dinner appetizer or just sit and enjoy a bowlful yourself!DSC_0016_edamane bean copy

Natural sea salt (no table salt here) is usually the typical condiment for serving with edamame beans and I like to posh that up a little by using some of the home-made vanilla salt from the store cupboard! The vanilla salt adds a subtle sweetness but of course you can just use plain sea salt or no salt if watching your salt intake! The only problem with the edamame bean… they are so moorish!

Actually I was wonder how easy edamame beans are to grow and it seems that we might have the perfect climate, sunny and humid… now maybe I might   order a few packets of edamame seeds! If I do then I will surely let you know how I get on! Maybe some enthusiastic farmer could start growing some edamame beans and sell them at the farmers market here in Bahrain!

How to cook edamame beans: Steam the required amount of edamame beans for about three minutes. Place into serving bowls or bowl and sprinkle over some vanilla sea salt or plain sea salt, if desired. To eat hold the pod and simple pop the beans into your mouth, you will also taste the salt, the pods are not edible so discard them into an empty dish!

Up-date: Since writing this post I have received my packets of edamame beans and hope to plant them after the summer months, Bahrain is so hot during this time. Will keep you posted when I do plant them and hopefully have some Edamame success!

desserts · food + drink

Christmas Pudding Ice Cream

Christmas Pudding Ice Cream-0119Using left over Christmas pudding to make an easy pudding ice cream is a refreshing alternative and makes a delicious festive dessert. Anytime I’ve served this dessert its gone down a treat. Buying a good quality ice cream saves time with preparation but you could also make your own using this recipe, omit the Kahlua and replace the pumpkin with Christmas pudding. Use individual pudding moulds for dinner parties or, use a large pudding mould for informal gatherings.

The new year is around the corner so I wish you all a very Happy New Year 2013 and hope it’s filled with health, happiness, lots of good times with friends and family and of course… delicious food!

Christmas Pudding Ice Cream

Ingredients:

  • 1 liter of good quality vanilla ice cream, softened
  • 175g Christmas pudding, chopped
  • 1/4 teaspoon of freshly grated nutmeg (optional)

for decoration

  • silver degrees
  • icing sugar

How to make: Before you start; chill the Christmas pudding (if not already in the fridge), bowls and utensils! Line individual pudding moulds (or large mould) with some cling-film, over lapping at the edges.

Place the ice cream, christmas pudding and nutmeg into a bowl and quickly mix until combined. Spoon into 6 (150ml) pudding moulds, cover with cling-film and place into the freezer for a couple of hours before serving.

To serve, turn out the christmas pudding ice-cream onto plates and remove the cling-film. Decorate with degrees and dust with some icing sugar, if desired.

This dessert can be made a couple of days in advance, before serving you might want to leave the dessert in the fridge for about 10 to 20 minutes (depending on size) to soften.

This post is part of the December photography challenge by Simone from Junglefrog Cookingwho is also hosting the Monthly Mingle from What’s for Lunch Honey by Meeta Wolff!