posts

Sweet Sixteens

untitled-

It has been some months since I participated in a sweet blog hop and when I saw the theme “Sweets without Heat” over at Nic’s Dining with a Stud, I knew straight away which recipe to enter! The Sweet Sixteens recipe is from the calendar  “Home Cooking” that a friend and I had worked on some years ago, back then I had no clue about photography so the styling and preparation of the food for the photo shoot was left to me. The photo above has some sweet memories, apart from being deliciously sweet, this was one of my first attempts at food styling for the camera! I also remember for this particular shoot, a short break was taken and on our return… a certain male in the house had eaten most of our “hero” food. Now knowing better I often get asked, “is this food for your photography or can we eat it?”

Sweet Sixteens is an old recipe for my childhood when living in Ireland and called Fifteens, as the recipe used 15 biscuits, 15 marshmallows and 15 cherries, I have always preferred calling them Sweet Sixteens! These yummy little morsels are not as sweet as you might think, even though the recipe uses sweetened condensed milk. With no heat involved these sweet treats are quick to make, however, the mixture needs a few hours in the fridge to set before slicing. Children will love helping you with this recipe and will take great delight in squashing the bag of coconut around, turning the coconut pink!
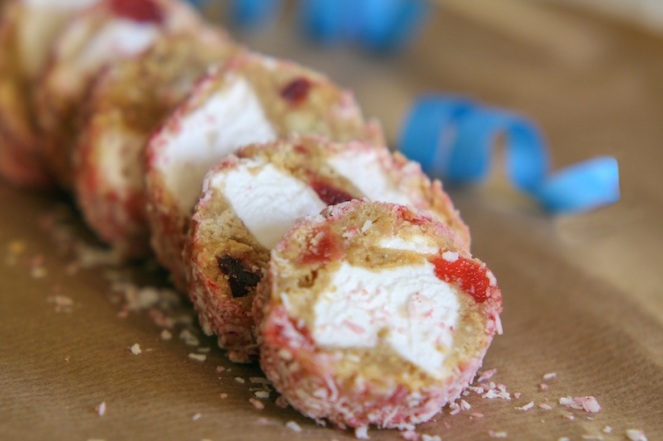
Sweet Sixteens

Ingredients:

  • 50g/2oz desiccated coconut
  • 2 or 3 drops of red food colour (optional)
  • 16 digestive biscuits, crushed finely
  • 16 red glacé cherries, quartered
  • 16 large white marshmallows, halved
  • 200ml or ¾ cup sweetened condensed milk

How to make: Mix together in a medium bowl the biscuits, cherries, marshmallows and sweetened condensed milk. If the biscuit mixture looks a little dry add another tablespoon of sweetened condensed milk, the mixture should not be very sticky.

Lay two sheets of greaseproof paper onto a work surface. Divide the contents of the bowl into two, tip mixture onto the greaseproof paper. With hands roll and form the mixture into a log.

Divide the coconut, sprinkle over log and greaseproof paper, roll each log until coated with coconut. Roll the log up firmly in the greaseproof paper, refrigerate for a couple of hours or overnight to set. Slice the logs into desired thickness. Store in an airtight container until needed. Makes 20 slices (approximately).

How to colour coconut pink: Place the coconut into a medium plastic bag, add a few drops of red food colour. Holding the bag closed, gently massage the food colour into the coconut until you have the desired pink colour.

Variations: Use green glacé cherries or a mix of both. Use a mix of pink and white marshmallows.

To see all the other delicious entires for “Sweets Without Heat” head over to the hosts blog Nic’s  Dining with a Stud, which is part of the Sweet Adventures Blog Hop held monthly.SABH_13-05_Raw-300

desserts · food + drink · posts

Sweet Date and Coconut Sauce

Everyone gets their own little cup for dunking some fresh fruit into this easy dessert sauce, made from date syrupfresh coconut cream, flavoured with pandan leaf and vanilla!  A sweet exotic sauce inspired by the cuisine of Bali, which use palm sugar, coconut and pandan leaf in many of their sweet and savoury dishes! Attending a cooking class some years back at Bumbu Bali and the many times we dinned at the restaurant gave me a deeper understanding of how authentic Balinese food is prepared and cooked using many wonderful aromatic spices!

Popular in the middle east where there is an abundance of date palms, date syrup is sweet without being overly cloying and can be used to replace other molasses wherever treacle and syrups are traditionally used… delicious drizzled over pancakes and waffles!

Brands of tinned coconut cream vary, some containing lots of additives, do check the label and buy the best quality you can find! If you are lucky enough to have a supermarket that grates fresh coconut (Lulu in Bahrain, saving you the trouble), why not make your own fresh coconut cream… which I will post with another recipe!

Infusing date syrup and coconut cream with pandan leaf releases its earthy fragrance (which needs heat or bruising), adding a subtle unique grassy flavour to this sweet sauce!

A sweet sauce that is easily adaptable by infusing the sauce with other spices, like star anise or cinnamon. Replace the coconut cream with fresh cream or simply serve this sweet sauce drizzled over some vanilla or mango ice cream for another quick dessert!

Sweet Date and Coconut Sauce with Fresh Fruit

Ingredients:

  • 125g date syrup
  • 300g coconut cream
  • 1 pandan leaf (screwpine), tied in a knot
  • pinch of sea salt
  • 2 teaspoons rice flour or cornflour mixed with 2 tablespoons of water
  • 1 teaspoon vanilla extract (home-made) or store bought
  • for garnish, freshly grated coconut ( or moisten dried coconut with a little coconut cream)
  • for serving, fresh pineapple, banana and apple, cut into cubes (squeeze a little lemon juice over the cut fruit to keep its colour)

How to make:  Pour the date syrup and coconut cream into a small saucepan, add the pandan leaf. Bring the contents of the saucepan to a boil, reduce the heat and gently simmer for about 3 minutes. Stir in the rice or cornflour mixture and cook for about two minutes, remove from heat and discard the pandan leaf. Stir in the vanilla extract and let the sauce cool before storing in the refrigerator.

To serve: Pour the chilled sauce into small cups or dishes and sprinkle over some fresh coconut, serve with freshly prepared fruit! Serves 6.

This post is part of the Sweet Adventures Blog Hop hosted by the The Capers of the Kitchen Crusader check out all the other delicious entries here!

desserts · food + drink · posts · store cupboard

easy mixed berry mousse made with uncooked raspberry jam

Fruit and dairy products make a delicious combination and chilled desserts using these ingredients can easily be assembled for quick summer entertaining. This months blog hop theme “Berry Nice to Meet You” found me scouring the supermarkets to find the freshest raspberries (organic if possible) available, as I wanted to make an uncooked raspberry jam. I love traditional jam making and had recently made some delicious Doughnut Peach Conserve, but it’s always nice to try a different method!

Planing an easy make-ahead dessert for entertaining, the uncooked raspberry jam was perfect for this easy berry mousse, assembled and served in glasses. Actually this berry mousse would make a wonderful filling for pavlovas, meringues and cakes.

When making the jam, warming the sugar makes it easier to dissolve and the heat helps release some of the pectin when mixed with the berries! Infusing the warming sugar with the wonderful perfume of thyme had more of a therapeutic effect on me than the taste it delivered. However the fresh thyme served with the finished mousse was really quite delicious…!

Using only sugar and raspberries in equal weights, Marguerite Pattens version of uncooked raspberry jam; heat the sugar for 15 minutes in an oven on a low temperature  before mixing with the berries until the sugar has dissolved, then place the jam into hot jars and store in the fridge. I would imagine using perfectly ripe berries would make a nicely set jam but I needed to give my jam a little helping hand by adding a small amount of gelatine.

Over at Serious Eats you can find different recipes for delicious uncooked jams or freezer jams (method of preserving), which use instant pectin for sure jam setting results. Less sugar and more fruit is my preference when making jams and conserves, I still find them very sweet… but also berry very delicious!

Room temperature does make this jam somewhat runny, so when serving this jam with freshly baked scones, I would leave a little pot resting on some crushed ice, keeping its spoonable consistency.

Uncooked Raspberry Jam

Ingredients:

  • 100g castor sugar
  • 5 sprigs of fresh thyme (optional)
  • 170g fresh raspberries or blackberries or you could even use a mix
  • 1 tablespoon lemon juice
  • 1/2 teaspoon powdered gelatine

How to make: Place the sprigs of thyme into a heatproof bowl and cover with the castor sugar. Place the bowl into the oven and turn the temperature to low (160°C), leaving the sugar to heat and infuse with the flavour of thyme for about 30 minutes, give a quick stir half way through heating.

While the sugar is warming place the raspberries into a bowl. Remove the hot sugar from the oven, discarding the thyme. Quickly sieve (catching any small bits of herb) over the raspberries. Gently mix together and set aside while preparing the gelatine.

Pour the lemon juice into a small heatproof dish and sprinkle over the gelatine, leave to sponge for a couple of minutes. Bring a small amount of water to a boil in a small saucepan, remove from heat and place the bowl containing the gelatine into the hot water. Stir the gelatine until completely dissolved.

Gently mix the raspberries and sugar a few more times, ensuring the sugar has melted. Stir the gelatine into the raspberry jam. Spoon the raspberry jam into a suitable jar rinsed with some boiling water, cover and leave the jam in the fridge to set, a few hours or overnight.

When making and assembling this dessert certain kitchen tools help with getting the job done faster… using an electric whisk to beat the cream and piping the berry mousse into the serving glasses using a piping bag fitted with a plain tipped nozzle.

Easy Berry Mousse

Ingredients:

  • 225ml whipping cream
  • 6 to 7 tablespoons uncooked raspberry jam or bought jam from a local farmers market

    to assemble

  • 6 glasses with narrow bottoms
  • 3 teaspoons raspberry jam
  • whole fresh blackberries
  • fresh thyme (optional)

How to make:  Pour the cream into a bowl and with and an electric whisk, whisk until thick and the cream holds its shape. Gently fold in the raspberry jam.

Assembling the dessert: Place a teaspoon of raspberry jam at the bottom of each glass, followed by a whole blackberry. Spoon or pipe the raspberry mousse evenly into each glass and top with another whole blackberry, garnish with thyme just before serving.

This dessert can be made several hours in advance, covered with cling film and stored in the fridge. Always serve chilled.

This post is part of the Sweet Adventures Blog Hop hosted by Christina from The Hungry Australian. See all the other delicious entries here.