food + drink · posts · store cupboard

Preserved Lemons

I always like to keep a constant supply of what I call my must-have store cupboard essentials, like home-made vanilla products, dried tomatoes, preserves etc.  Even though I refer to them as store cupboard items, some need refrigeration, as living in the middle east does not allow for a cool enough pantry or store cupboard.

Used in Moroccan and North African cooking, preserved lemons are an indispensable and wonderful item to have… at a moments notice food can take on a new dimension both in flavour and taste by adding small amounts of preserved lemons to salad dressings, salads, stews, relishes, pizza toppings, stuffings, marinades and so much more.

When I started preserving lemons I remember following a recipe that used so much salt that I found them inedible and quite horrible, throwing the whole lot in the bin and not thinking much of preserved lemons.

Before satellite TV came to Bahrain my parents would record cookery programs for me and send them by post. Dad was usually in charge of editing but I could always tell when he had nodded off on the job, leaving me to watch cookery programs along with long TV commercials and bits of other programs. And it was in one of those recorded cookery programs I gave preserved lemons another chance… and if you have never tried making them before, it is so worth the effort!

A little goes a long way with preserved lemons, which are salty, tart and intensely flavoursome and when it comes to slicing and dicing the preserved lemons, a good sharp knife is a must, obtaining the finest results.

With a lemon tree (two years) growing in the garden I would so like to tell you that I am using my own organic lemons, but will have to wait until next year… all my lovely little lemons this year turned black and fell off 😦  I am still not giving up… so fingers crossed for next year.
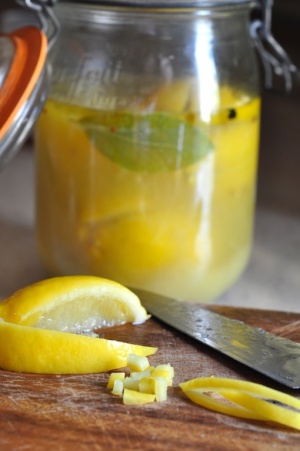
Preserved Lemons - Diced and Sliced

 Preserved Lemons

Ingredients:

  • 5 lemons, (see note below if not using organic or un-waxed lemons)
  • 5 rounded tablespoons of sea salt
  • 1/8 teaspoon mustard seeds
  • 1/4 teaspoon whole black peppercorns
  • 5 cloves
  • 1 small cinnamon stick
  • 2 fresh or dried bay leaf
  • extra juice of 3 or 4 lemon (zest beforehand and use in another recipe or dry the peel)
  • olive oil

You will need a suitable preserving jar with a tight fitting lid.

How to make: Using a sharp knife cut the lemons lengthways into 4 quarters, stopping just about 1/2cm before the stem, keeping the lemon quarters intact. Open the lemons up a little and place a rounded tablespoon of salt into the middle of each lemon. Tightly pack all the lemons into a clean sterilized jar, adding the mustard seeds, black peppercorns, cloves, cinnamon stick and bay leaf. Cover the jar with a lid and set aside for several hours, by this time the lemons will start to release a little of their juices.

Open up the jar and using the back of a small ladle, push the lemons down into the jar, helping to release more juice. Pour in the extra lemon juice to fully cover the lemons. Pour a thin layer of olive oil over the surface of the lemon juice and cover with a lid.

Store in the refrigerator for one month before using! When using the preserved lemons remove the pulp and dice or slice the required amount. The pulp can be liquidized and used sparingly in marinades, stews or discarded if wished. Use lemons within six months.

Tip: To help remove and melt the wax from lemons; place lemons into a heatproof bowl and pour over some very hot (not boiling) water. Leave the lemons to sit for a minute or two. Remove the lemons using a slotted spoon or tongs and immediately dry the warm lemons by rubbing them with some kitchen paper or a clean lint free tea towel.

Try using different whole spices like, fennel seeds, cumin, coriander seeds, cardamon pods allspice and star anise, you could also add whole dried chilli.

Have you made or used preserved lemons before? What is your favourite way of using them?

baking · food + drink · posts

cinnamon buns – fresh from the oven

Recently I came across some delicious looking saffron buns, baked as part of the Fresh from the Oven Challenge! Now I knew the only way I was going to have one of these buns was to bake them myself and with some home-made Doughnut Peach Conserve in the fridge… how could I resist! When it comes to bread making there is no greater pleasure than the smell and taste of bread fresh from the oven… Irish soda bread is baked quite often in our house!

Sally from My Custard Pie had set the challenge and the full recipe and instructions for saffron buns will be found on her blog!  As cinnamon is a favourite with everyone in our family I decided to forgo the saffron for another time! I did follow Sally’s recipe and method and the only changes I made were as follows:

  • Omitted the saffron and replaced with 1 teaspoon of ground cinnamon which was sieved in with the flour and salt
  • Used light brown muscovado sugar instead of golden caster sugar
  • Used salted butter instead of unsalted
  • Used 1/4 teaspoon of salt instead of 1/2 teaspoon

When it came to adding the water to the dry ingredients I needed a little more than the 100ml of water suggested… depends on the brand and type of flour used, so maybe keep this in mind!

The kitchen was a bit on the warm side so when it came to rubbing the butter into the flour I opted to use a pastry blender which is a handy kitchen tool to have, especially if you have warm hands.

Kneading bread dough is a very therapeutic process (one that I love), but this time I decided to use the dough hook on a stand mixer, making the process of kneading the dough a breeze!

Rather than placing all the pieces of dough on a baking tray to prove, I placed them into small lightly oiled baking tins… giving them a different shape when baked, which of course is completely optional.

The dough took longer than one hour to prove and I did find by moving the dough to a much warmer area of the house gave the dough a better rise! The cinnamon buns were baked in a preheated oven for about 15 minutes. Serve warm with butter and preserves.

You could also try to make a really easy Uncooked Raspberry Jam which would be very delicious with these cinnamon buns or other home-made breads! 

desserts · food + drink · posts · store cupboard

easy mixed berry mousse made with uncooked raspberry jam

Fruit and dairy products make a delicious combination and chilled desserts using these ingredients can easily be assembled for quick summer entertaining. This months blog hop theme “Berry Nice to Meet You” found me scouring the supermarkets to find the freshest raspberries (organic if possible) available, as I wanted to make an uncooked raspberry jam. I love traditional jam making and had recently made some delicious Doughnut Peach Conserve, but it’s always nice to try a different method!

Planing an easy make-ahead dessert for entertaining, the uncooked raspberry jam was perfect for this easy berry mousse, assembled and served in glasses. Actually this berry mousse would make a wonderful filling for pavlovas, meringues and cakes.

When making the jam, warming the sugar makes it easier to dissolve and the heat helps release some of the pectin when mixed with the berries! Infusing the warming sugar with the wonderful perfume of thyme had more of a therapeutic effect on me than the taste it delivered. However the fresh thyme served with the finished mousse was really quite delicious…!

Using only sugar and raspberries in equal weights, Marguerite Pattens version of uncooked raspberry jam; heat the sugar for 15 minutes in an oven on a low temperature  before mixing with the berries until the sugar has dissolved, then place the jam into hot jars and store in the fridge. I would imagine using perfectly ripe berries would make a nicely set jam but I needed to give my jam a little helping hand by adding a small amount of gelatine.

Over at Serious Eats you can find different recipes for delicious uncooked jams or freezer jams (method of preserving), which use instant pectin for sure jam setting results. Less sugar and more fruit is my preference when making jams and conserves, I still find them very sweet… but also berry very delicious!

Room temperature does make this jam somewhat runny, so when serving this jam with freshly baked scones, I would leave a little pot resting on some crushed ice, keeping its spoonable consistency.

Uncooked Raspberry Jam

Ingredients:

  • 100g castor sugar
  • 5 sprigs of fresh thyme (optional)
  • 170g fresh raspberries or blackberries or you could even use a mix
  • 1 tablespoon lemon juice
  • 1/2 teaspoon powdered gelatine

How to make: Place the sprigs of thyme into a heatproof bowl and cover with the castor sugar. Place the bowl into the oven and turn the temperature to low (160°C), leaving the sugar to heat and infuse with the flavour of thyme for about 30 minutes, give a quick stir half way through heating.

While the sugar is warming place the raspberries into a bowl. Remove the hot sugar from the oven, discarding the thyme. Quickly sieve (catching any small bits of herb) over the raspberries. Gently mix together and set aside while preparing the gelatine.

Pour the lemon juice into a small heatproof dish and sprinkle over the gelatine, leave to sponge for a couple of minutes. Bring a small amount of water to a boil in a small saucepan, remove from heat and place the bowl containing the gelatine into the hot water. Stir the gelatine until completely dissolved.

Gently mix the raspberries and sugar a few more times, ensuring the sugar has melted. Stir the gelatine into the raspberry jam. Spoon the raspberry jam into a suitable jar rinsed with some boiling water, cover and leave the jam in the fridge to set, a few hours or overnight.

When making and assembling this dessert certain kitchen tools help with getting the job done faster… using an electric whisk to beat the cream and piping the berry mousse into the serving glasses using a piping bag fitted with a plain tipped nozzle.

Easy Berry Mousse

Ingredients:

  • 225ml whipping cream
  • 6 to 7 tablespoons uncooked raspberry jam or bought jam from a local farmers market

    to assemble

  • 6 glasses with narrow bottoms
  • 3 teaspoons raspberry jam
  • whole fresh blackberries
  • fresh thyme (optional)

How to make:  Pour the cream into a bowl and with and an electric whisk, whisk until thick and the cream holds its shape. Gently fold in the raspberry jam.

Assembling the dessert: Place a teaspoon of raspberry jam at the bottom of each glass, followed by a whole blackberry. Spoon or pipe the raspberry mousse evenly into each glass and top with another whole blackberry, garnish with thyme just before serving.

This dessert can be made several hours in advance, covered with cling film and stored in the fridge. Always serve chilled.

This post is part of the Sweet Adventures Blog Hop hosted by Christina from The Hungry Australian. See all the other delicious entries here.