baking · food + drink · posts

Welsh Cheese Cakes

welsh cheesecakes-2

When the theme “Sweet as Pie” was announced for this months Sweet Adventures Blog Hop hosted by KC of the Capers of a Kitchen Crusader… apple pie came to mind. Warm apple pie with a dollop of fresh cream… delicious!  But after giving the theme some more thought I started thinking back to my school days… my favourite subject… home economics.

I remembered these  “little jam pie cakes” baked during one of the cooking lessons but I couldn’t remember what they were actual called. They were a cross between a pie and a cake with a jam filling.  But I do remember that I loved baking them and did so on many occasions during those years.

Update: 2015 🙂 Happy to announce that my sweet as pie Welsh cheese cake photograph is published in the new edition of Essentials of Living text book for Irish Students.

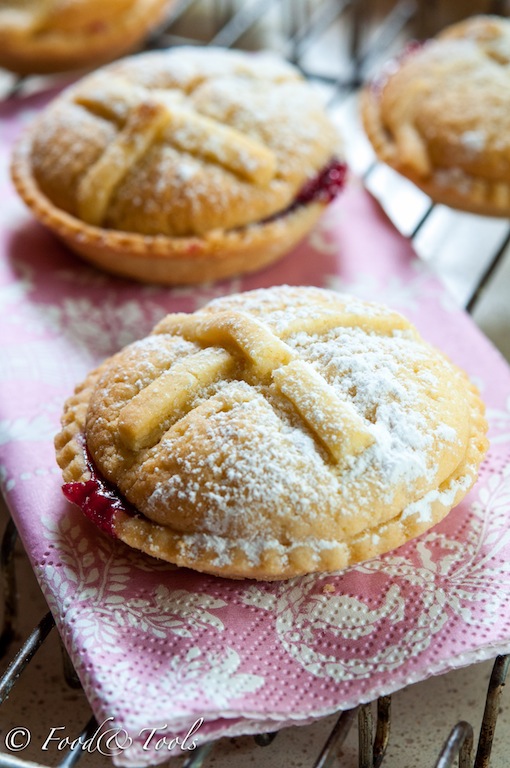
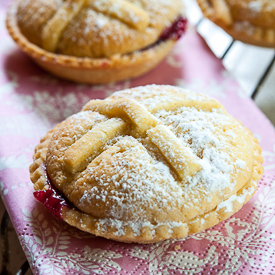
Not so long ago I acquired two old Irish cookery books called   “All In The Cooking” from my mother (no way were these gems going in the bin)  which Mum had used during her teacher training days at college. The cookery books were official text books compiled for students and classes of Domestic Science in Ireland and printed during the 1940’s and 50’s.  Flicking through the old yellowed pages and scouring over the recipes, came across what I was looking for… these little jam pie cakes were called “Welsh Cheese Cakes.” Maybe our domestic science teacher called them something different. Why they are called cheesecakes… I have no idea and there is no cheese in them either!  But the theme for the blog hop is pies… pastry on the bottom and pastry on the top… well these Welsh Cheese Cakes fit the bill.

This is the first time I have baked this old school recipe for my family and once the camera was set aside (although I got the first bite), the cakes were eaten and the family  statement was “why have you never made these before”… home baking at its best!

Some notes: As I used a 12 hole patty tin more pastry was required, the pastry weight stated in the orignal recipe seemed on the low side anyway! Rolling the pastry into 1/4 inch thickness was a bit on the chunky side for me so I went for about 1/8 inch thickness, a little more delicate! Using a home-made sweetened short crust pastry was also a preference, but when buying  short crust pastry from the supermarkets I choose pastry made with butter!

When making the cake filling I used the all- in- one method of cake mixing for this recipe, which is quicker, rather than the creaming method. The cake filling was soft enough when mixed so I omitted the milk and used vanilla extract for the flavouring.

Welsh Cheesecakes
Welsh Cheesecakes

Welsh Cheese Cakes

 (Adapted from the All In The Cooking, see below for original recipe)

Ingredients:

  • 200g short crust pastry (home-made or bought)
  • 2 tablespoons of blackcurrant jam

for the cake filling

  • 50g butter, softened
  • 50g castor sugar
  • 75g all-purpose flour
  • 1/4 teaspoon baking powder
  • 1/4 teaspoon vanilla extract
  • 1 egg
  • icing sugar, for dusting (optional)
Useful Kitchen Jewellery:
  • 12 hole patty tin
  • rolling-pin
  • pastry cutter
  • electric beater
  • kitchen weighing scales

How to make:

Pre-heat the oven to 350°F/180°C/160°C Fan/Gas 4.

On a lightly floured work-surface roll out the pastry to 1/8 inch thickness. Cut into 12 rounds using a 3-inch round fluted pastry cutter and line the un-greased patty tin with the pastry. Re-roll the scrapes of pastry out into 1/8 inch thickness and cut pastry into thin match-like strips, you will need 2 strips per cake.

Place a 1/2 teaspoon of jam into the middle of each pastry round. Place patty tin into the fridge (especially if the kitchen is very warm) while making the filling.

Put the butter into a medium mixing bowl and sieve in the castor sugar, flour and baking powder. Next add in the vanilla extract and egg.

Beat all the ingredients together using an electric mixer for about 2 minutes or until mixture is smooth and lighter in colour.

Place 1 heaped teaspoon of cake mixture over the jam, then cross two strips of pastry over the top of the cake mixture.

Bake for about 18 to 20 minutes or until light golden. Leave to cool in the tin for about 5 minutes before transferring to a wire cooling rack. Dust over some icing sugar before serving, if using.

Original Recipe from All In The Cooking 

This post has been part of the “Sweet Adventures Blog Hop, click here to see all the other “Sweet as Pie” entries!

baking · food + drink · posts

matcha tea and lemon cupcakes frosted with a matcha tea buttercream

The Sweet Adventures Blog hop theme this month is “What’s your cup of Tea,” and hosted by 84th and 3rd.  A perfect opportunity  to use my new muffin tin which I bought on a recent trip! Why buy another cupcake or muffin tin when I already have so many? Well, the shape caught my eye!  Baked muffins and cupcakes in this cake tin take on a different appearance, tall and narrow  with some having domed shaped tops depending on the recipe being used! What ever way they come out they all look really cute!

 With some lime green cupcake liners (also my new muffin pan), matcha tea in the cupboard and lemons in the fridge, it was decided… matcha tea with lemon cupcakes! Matcha tea is a high quality Japanese green tea which has many health benefits,  guess using this in the cupcake recipe is a good thing…  might just think these cupcakes are really good for my health… right!

My matcha tea probably could have been fresher,  it had been already opened for a few months and the powder was not as green as when first opened, guess I will have to stock up again and use the older matcha tea for this face mask!  Usually I buy matcha tea from Asian supermarket which is beside the Oriental supermarket, both opposite the Central Market for those living in Bahrain.

Matcha Tea and Lemon Cupcakes with a Matcha Tea Buttercream Topping

Ingredients:

  • 110g salted butter, softened
  • 110g caster sugar
  • zest of one lemon rind
  • 1 teaspoon of matcha tea
  • 2 eggs, lightly beaten together
  • 75g all-purpose flour
  • 25g self-raising flour
  • 1 heaped tablespoon of home-made full-fat plain yogurt or shop bought

for the matcha tea buttercream:

  • 25g cream cheese, softened
  • 50g unsalted butter, softened
  • 200g icing sugar (a little more if needed)
  • 2 teaspoons, whipping or single cream
  • 1/4 teaspoon match tea
  • green edible glitter dust (optional)
You will need a 12 hole cupcake tin lined with 12 cupcake liners
Note: These cupcakes have a light flavour of matcha tea (I am not the green tea drinker in the house), but you can increase the flavour (and colour) by adding another 1/4 teaspoon of matcha tea into the buttercream frosting.

Useful Kitchen Jewellery:                    

  • cupcake pan
  • measuring spoons
  • mixing bowls
  • spatulas
  • electric whisk
  • sieve
  • microplane zester
  • wire cooling rack
  • piping bag and nozzle
  • kitchen scales

How to make:

Pre-heat the oven to 180°C/350°F/Gas 4/Fan 160°C.

Add the butter, caster sugar and lemon zest into a mixing bowl. Sieve in the matcha tea. Using and electric mixer, beat ingredients together until light and fluffy.

Add the beaten eggs (a few tablespoons at a time) to the cake mixture, beating well after each addition.

Sift in the flours and fold into cake mixture with a spatula until the cake mixture is smooth, stir in the yogurt.

Bake cupcakes for about 18 to 20 minutes or until  middle of cupcake springs back when lightly pressed with fingers.

Let the cupcakes sit in the baking pan for a few minutes before transferring to a wire cooling rack.

For the buttercream frosting:

Add the cream cheese and butter to a mixing bowl, beat  together with an electric mixer until soft and smooth.

Gradually sift in the icing sugar and beat until all the icing sugar is incorporated.

In a small bowl mix the cream and matcha tea to a paste and then beat this into the buttercream.

Spoon the matcha buttercream into a piping bag fitted with a rosette nozzle,  pipe a small swirl on top of each cupcake. Dust lightly with edible glitter dust, if desired .

 Tip: Dry your washed baking tins up-side down in the residual heat from the oven after baking, Mum used to always do this!  The heat will dry your pans completely and stop rust forming on some pans.

This post is part of the Sweet Adventures Australian Blog Hop, “What’s your cup of Tea,” click here to see all the other entries!

Keep a lookout for more cupcakes and muffins using this baking tin!
posts

Rocky Road Chocolate Cakes

Looking at the Good Food Calendar hanging in my kitchen I could not help but take  notice of the very rich and delectable looking Rocky Road Chocolate Cake featured for the month of April… it was like as if the photograph was saying…“bake me”, “bake me”… so I did exactly that!  It has been quite some time since I made anything rocky road and with my son back for the holidays, home baked goodies were back on the menu.

I quite liked the idea of a chocolate cake topped with a layer of rocky road which consisted of  melted chocolate, marshmallows, walnuts, raisins and crunchy Maltesers… definitely a rustic and homely looking bake!

Place some Rocky Road Chocolate Cakes into little gift boxes and give to family and friends for a special Easter treat.

Rocky Road Chocolate Cakes

( recipe and method from the 2012 Good Food Calendar)

Ingredients:

  • 175g/6oz butter, plus extra for greasing
  • 200g/8oz light soft brown sugar
  • 2 large eggs
  • 140g/5oz self-raising flour
  • 50g/2oz cocoa powder
  • For the Rock Road
  • 100g/4oz butter
  • 300g/11oz dark chocolate, roughly chopped
  • 3 tablespoons golden syrup
  • 12 marshmallows, halved with scissors
  • 85g/3oz Maltesers
  • 85g/ raisins
  • 50g/2oz walnut halves

Note: Looking at the recipe I decided to add in 1 teaspoon of vanilla extract when mixing the ingredients for the chocolate cake base.

Rubbing a little vegetable oil on the scissors, helps prevent the marshmallows from sticking.

I omitted the raisins from the rocky road layer.

Chilling the finished cake makes cutting into squares much easier.

You will need a 20cm square cake tin greased and lined (side and base) with baking parchment.

How to make: Pre-heat the oven to 180C/350F/160C fan/Gas 4.

Gently melt the butter in a large pan, cool for 5 minutes, then stir in the eggs, flour and cocoa and beat well. Spoon into tin, level the surface and bake for 35 minutes or until a skewer inserted into the centre of the cake comes out clean.

To make the rocky road: Gently melt the butter, chocolate and syrup together. Cool for 15 minutes, then stir in the marshmallows, Maltesers, raisins and walnuts. Make sure the chocolate is cool because if it isn’t the marshmallows will melt. Spoon on top of cake in tin and lightly spread to cover it completely. Leave to set in a cool place. Remove from tin, carefully strip off the lining paper and cut into squares.

Easy: Colour some white eggs with food coloring. Mix a few drops of food colouring with some water in a bowl. Place eggs into the coloured water and leave until eggs are desired colour